API Gateway를 구현해보자. 그 전에 API Gateway가 있을 때 얻는 이점이 무엇이길래 이 녀석을 구현하는지 알아보자.
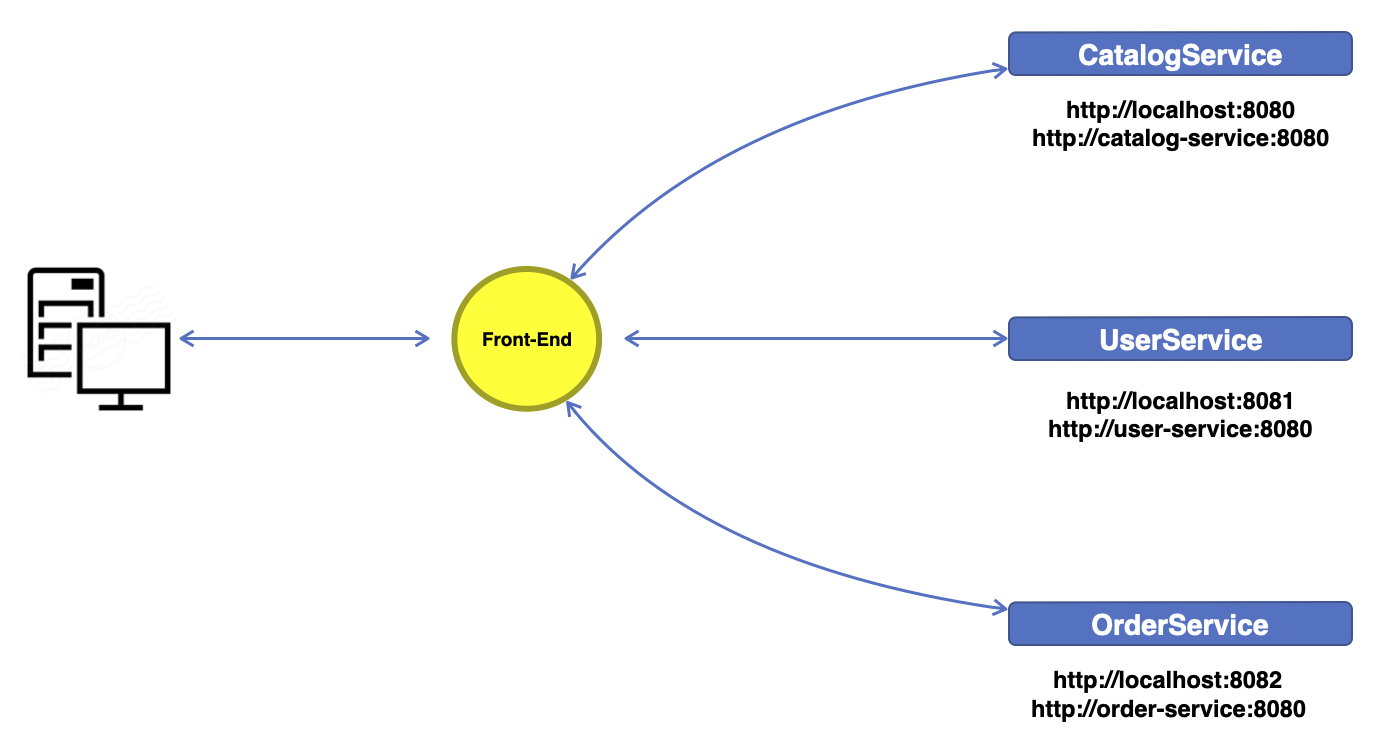
API Gateway가 없을 때 외부에서 어떤 요청을 하면 그 요청을 앞 단에서 해당 요청을 처리하는 서비스(뒷 단)와 통신하여 응답을 외부에게 돌려주는 구조가 될 것이다. 이 상태에서는 어떤 문제도 없지만 만약 기존에 있던 서비스들 중 어떤 것이 URL이 변경된다던지, 서비스를 운영하는 서버가 이전된다던지 등 어떤 변화가 생기게 되면 서비스의 URL같은 호출 정보가 변경된다. 호출 정보가 변경되면 그 변경 사항에 맞게 앞 단은 다시 설정 작업을 해야하고 그 작업으로 인해 서비스는 다운타임이 발생한다.
이와 반대로 API Gateway와 같은 중개자가 있는 구조를 살펴보자.
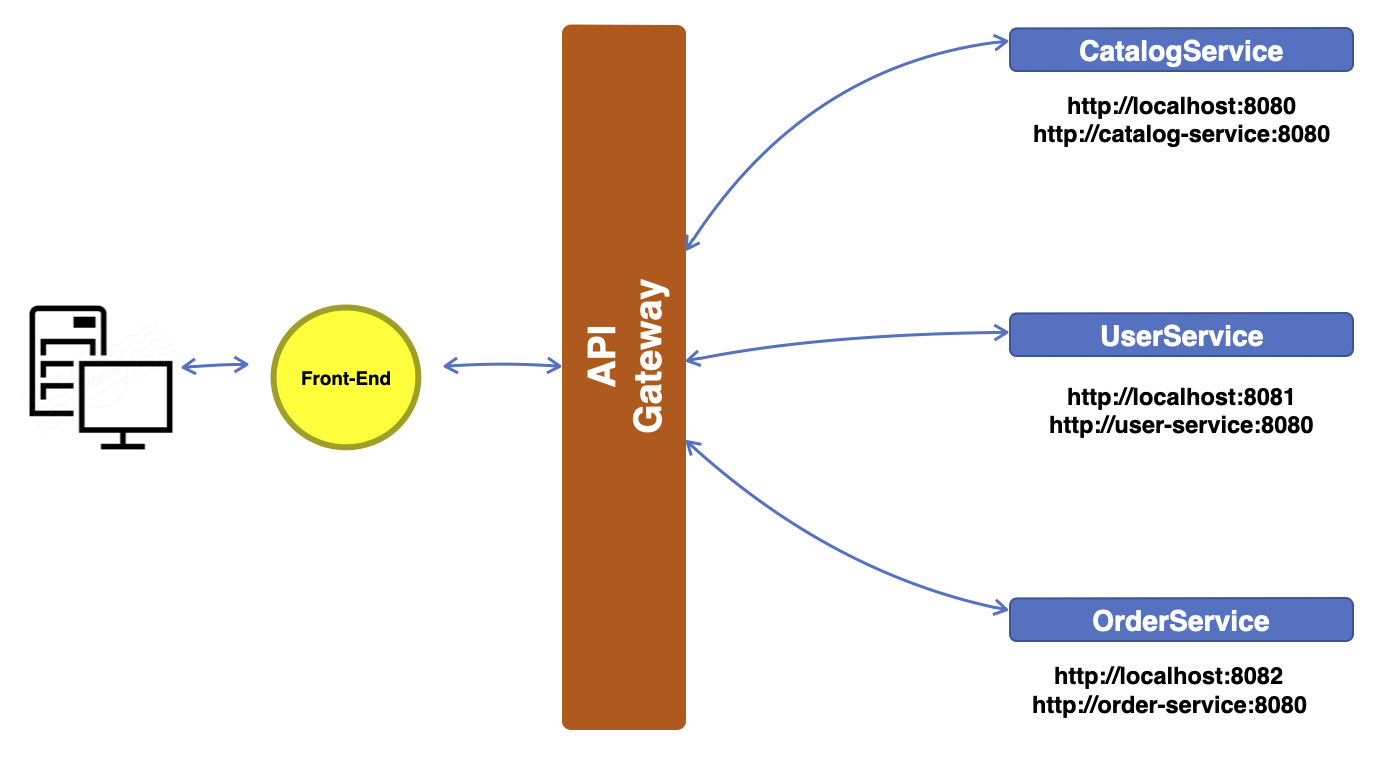
이런 구조를 가졌을 때 외부에서 요청이 들어오면 앞 단은 그 요청을 API Gateway에게 보내게 되고 API Gateway는 그 요청을 처리해주는 서비스에게 전달해주기만 하면 된다. 여기서 만약 위와 같은 상황인 서비스의 URL이 변경되거나, 서비스를 운영하는 서버가 이전된다거나 하더라도 앞 단에서 수정할 부분은 없다. 앞 단은 서비스가 무엇이 있는지조차 알 필요도 없다. 그저 API Gateway와 통신만 하면 되기 때문이다. 서비스를 운영하는 서버가 이전된 경우에 그 서버를 API Gateway에 등록(정확히는 Service discovery이지만 그림에서 표현하지 않았기에 편의상)하기만 하면 된다. 심지어 같은 서비스의 여러 인스턴스가 존재할 때 Load Balancing 처리도 해주기에 좋은 점은 늘어난다.
그럼 이제 API Gateway를 구현해보자.
Spring Cloud Gateway 생성
Spring Initializr로 빠르게 생성해보자.

이전과 전부 동일하고 이름만 변경한 뒤 Next

Dependencies는 Lombok과 Gateway를 선택하고 프로젝트 생성.
pom.xml
<?xml version="1.0" encoding="UTF-8"?>
<project xmlns="http://maven.apache.org/POM/4.0.0" xmlns:xsi="http://www.w3.org/2001/XMLSchema-instance"
         xsi:schemaLocation="http://maven.apache.org/POM/4.0.0 https://maven.apache.org/xsd/maven-4.0.0.xsd">
    <modelVersion>4.0.0</modelVersion>
    <parent>
        <groupId>org.springframework.boot</groupId>
        <artifactId>spring-boot-starter-parent</artifactId>
        <version>3.1.4</version>
        <relativePath/> <!-- lookup parent from repository -->
    </parent>
    <groupId>com.example</groupId>
    <artifactId>tistory-gateway</artifactId>
    <version>0.0.1-SNAPSHOT</version>
    <name>tistory-gateway</name>
    <description>tistory-gateway</description>
    <properties>
        <java.version>17</java.version>
        <spring-cloud.version>2022.0.4</spring-cloud.version>
    </properties>
    <dependencies>
        <dependency>
            <groupId>org.springframework.cloud</groupId>
            <artifactId>spring-cloud-starter-gateway</artifactId>
        </dependency>

        <dependency>
            <groupId>org.projectlombok</groupId>
            <artifactId>lombok</artifactId>
            <optional>true</optional>
        </dependency>
        <dependency>
            <groupId>org.springframework.boot</groupId>
            <artifactId>spring-boot-starter-test</artifactId>
            <scope>test</scope>
        </dependency>
    </dependencies>
    <dependencyManagement>
        <dependencies>
            <dependency>
                <groupId>org.springframework.cloud</groupId>
                <artifactId>spring-cloud-dependencies</artifactId>
                <version>${spring-cloud.version}</version>
                <type>pom</type>
                <scope>import</scope>
            </dependency>
        </dependencies>
    </dependencyManagement>

    <build>
        <plugins>
            <plugin>
                <groupId>org.springframework.boot</groupId>
                <artifactId>spring-boot-maven-plugin</artifactId>
                <configuration>
                    <excludes>
                        <exclude>
                            <groupId>org.projectlombok</groupId>
                            <artifactId>lombok</artifactId>
                        </exclude>
                    </excludes>
                </configuration>
            </plugin>
        </plugins>
    </build>

</project>
이번에는 전과 달리 Spring Initializr에서 모든 dependencies를 받아오는 게 아니라 직접 추가하는 법을 알아보자.
필요한 건 netflix eureka.
pom.xml파일에 dependencies 하위에 이렇게 추가해보자.
<dependency>
    <groupId>org.springframework.cloud</groupId>
    <artifactId>spring-cloud-starter-netflix-eureka-client</artifactId>
</dependency>
이렇게 pom.xml파일을 수정했으면 pom.xml파일을 다시 load해야한다.
방법은 두가지인데 pom.xml파일에 수정이 생기면 IntelliJ에서는 우측 상단에 이런 표시가 나타난다.

이걸 클릭하거나 우측 Maven 탭이 있다.

이 탭을 눌러보면 상단에 Reload 버튼을 눌러도 된다.

pom.xml에 명시한 dependencies들을 모두 정상적으로 내려받았으면 지금은 더 할 게 없다. 이제 application.yml파일을 작성한다.
application.yml
application.yml 파일로 우선 이름을 변경하고 다음과 같이 작성했다.
server:
  port: 8000
eureka:
  client:
    register-with-eureka: false
    fetch-registry: false
    service-url:
      defaultZone: http://localhost:8761/eureka

spring:
  application:
    name: api-gateway-service
  cloud:
    gateway:
      routes:
        - id: user-service
          uri: http://localhost:8081/user-service/**
          predicates:
            - Path=/user-service/**
여기서 주의깊게 볼 부분은 spring.cloud.gateway.routes이다.
spring cloud gateway에 어떤 서비스들을 등록되어 라우팅될 것인지를 작성하는 부분인데 내가 만든 UserService를 이 gateway에 등록해서 UserService에 대한 요청이 들어오면 요청을 전달해준다. 그 때 작성하는 부분이 id, uri, predicates이다.
id는 고유값으로 서비스 이름을 설정했다. uri는 해당 서비스가 실행되고 있는 URL정보를 작성한다. predicates은 조건을 명시하는 부분인데 Path에 /user-service/**로 작성하게 되면 gateway로 들어오는 요청의 path 정보가 user-service가 붙고 그 뒤에 어떤 값이 들어오더라도 uri에 명시한 서비스로 요청을 전달한다.
이 application.yml 파일은 많은 변화가 있을 예정이지만 일단은 지금 상태로도 충분하다.
Start Gateway Server
이렇게 작성해놓고 Gateway Service를 실행시켜보면 다음처럼 정상적으로 실행됐다는 로그가 찍혀야한다.

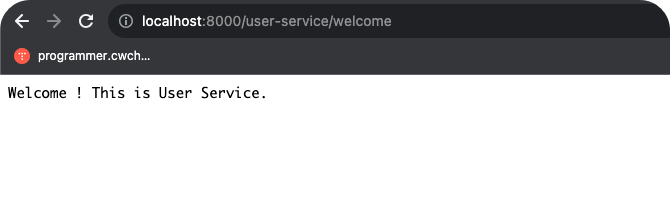
정상적으로 Gateway Service가 올라왔고 이 Gateway를 통해 UserService를 호출했을 때 UserService로 요청이 전달되는지 확인해본다. 그러기 위해서는 UserService에 Controller가 필요하다.
UserService Controller
controller 패키지 하나를 만들고, 그 안에 StatusController.java 파일을 생성
package com.example.tistoryuserservice.controller;

import org.springframework.web.bind.annotation.GetMapping;
import org.springframework.web.bind.annotation.RequestMapping;
import org.springframework.web.bind.annotation.RestController;

@RestController
@RequestMapping("/")
public class StatusController {

    @GetMapping("/welcome")
    public String welcomePage() {
        return "Welcome ! This is User Service.";
    }
}
간단한 Welcome page를 만들었다. UserService의 /welcome으로 요청하면 "Welcome ! this is User Service."라는 문장이 노출되어야 한다. 그러나, gateway를 통해 요청해보면 다음과 같은 404 에러 화면을 마주하게 된다.

이런 현상이 발생하는 이유는 gateway를 통해 호출하는 경로 http://localhost:8000/user-service/welcome 이는 곧 gateway에서 routing 설정대로 http://localhost:8081/user-service/welcome으로 전달한다.
http://localhost:8000/user-service/welcome -> http://localhost:8081/user-service/welcome
그러나, 만든 UserService의 welcome page 경로는 http://localhost:8081/welcome으로 되어 있다. (위 controller 코드 참고)
그렇기 때문에 404에러를 마주하게 된다. 이를 해결하기 위해 UserService의 Controller를 수정하자.
package com.example.tistoryuserservice.controller;

import org.springframework.web.bind.annotation.GetMapping;
import org.springframework.web.bind.annotation.RequestMapping;
import org.springframework.web.bind.annotation.RestController;

@RestController
@RequestMapping("/user-service")
public class StatusController {

    @GetMapping("/welcome")
    public String welcomePage() {
        return "Welcome ! This is User Service.";
    }
}
StatusController 클래스의 @RequestMapping value를 "/user-service"로 명시했다. 이 클래스에 대한 context path를 지정한것과도 같다. 이렇게 설정한 후 다시 서버를 실행시켜서 확인해보면 정상 응답을 돌려받는다.
마무리
간략하게 Gateway Service를 구현해봤고 앞으로 더 많은 작업을 할 예정이다. 본 포스팅은 여기서 마무리.
'MSA' 카테고리의 다른 글
| [MSA] Part 7. API Gateway를 Eureka에 등록하기 (0) | 2023.10.10 |
|---|---|
| [MSA] Part 6. Gateway Filter (2) | 2023.10.10 |
| [MSA] Part 4. Service 등록 (User) (0) | 2023.10.06 |
| [MSA] Part 3. Spring Cloud Netflix Eureka (0) | 2023.10.06 |
| [MSA] Part 2. Spring Cloud란? (0) | 2023.10.06 |