Spring Cloud Netflix Eureka는 Service discovery tool을 말한다. Service discovery는 분산 시스템에서 각 인스턴스(서비스)들을 등록하고 관리해 주는데 관리해 준다는 건 외부에서 요청이 들어올 때 그 요청을 처리할 수 있는 인스턴스(서비스)가 어떤 서비스인지를 찾아주는 것을 포함한다.
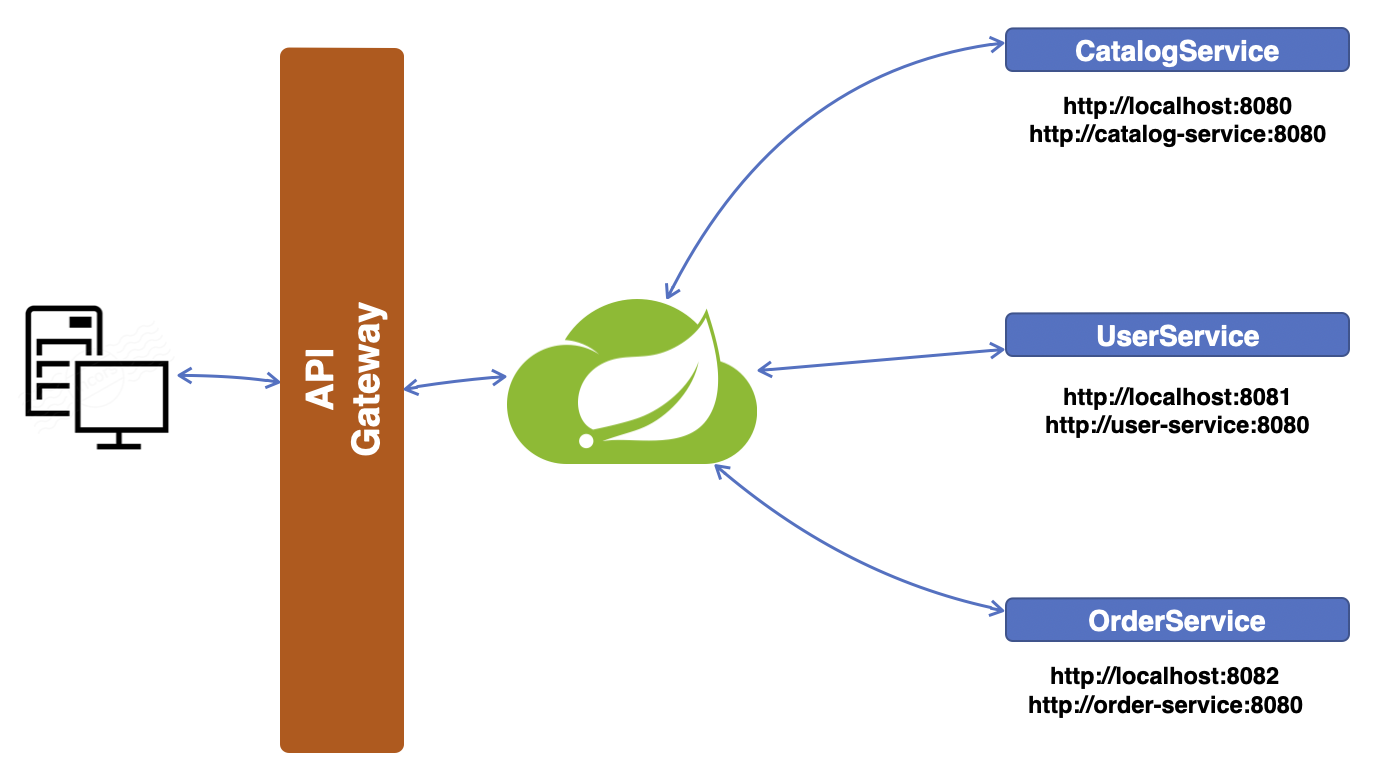
위 그림에서 Netflix Eureka는 API Gateway 바로 다음 단계에 존재하는데, 서비스에 외부 요청이 들어오면 API Gateway는 요청을 받아 해당 요청을 처리할 수 있는 서비스를 찾기 위해 Eureka에게 물어본다. Eureka는 해당 요청을 처리할 수 있는 서비스가 본인한테 등록된 게 있는지 확인 후 있다면 해당 서비스에게 요청을 전달한다. 이렇게 각 서비스들을 관리하고 등록하는 작업을 하는 게 Service discovery고 Spring에서는 Netflix Eureka를 사용할 수 있다.
위 그림에서 각 서비스는 각기 다른 서버에서 구현될 수도 있고 같은 서버내에 포트번호를 다르게 설정하여 동시에 띄울 수 있다. 그에 따라 각 서비스별 호출 URL이 달라질 수 있음을 그림에서 표현한다. 이제 이 Service discovery를 직접 구현해 보자.
Spring Eureka Server 생성
IntelliJ IDEA를 이용해서 프로젝트를 생성할 거다. 우선 New Project로 프로젝트를 만들기 시작하면 좌측 Generators 섹션에 Spring Initializr가 보인다.

여기서 나는 다음과 같이 설정을 했다.

Name, Location은 원하는 대로 설정하면 되고 Language는 Java를 Type은 Maven을 설정했다.
Group은 회사라면 회사 도메인을 거꾸로 쓰는 게 일반적이다. 여기서는 그냥 com.example로 설정했다.
Artifact는 애플리케이션 이름을 작성하면 되며
Package name은 Group.Artifact를 이어 붙여서 설정한다.
JDK는 20으로 설정했고 Java 버전은 17로 설정했다.
Packaging은 Jar를 선택하면 된다.
Next를 누르면 Spring Boot 버전과 Dependencies를 설정할 수 있다.
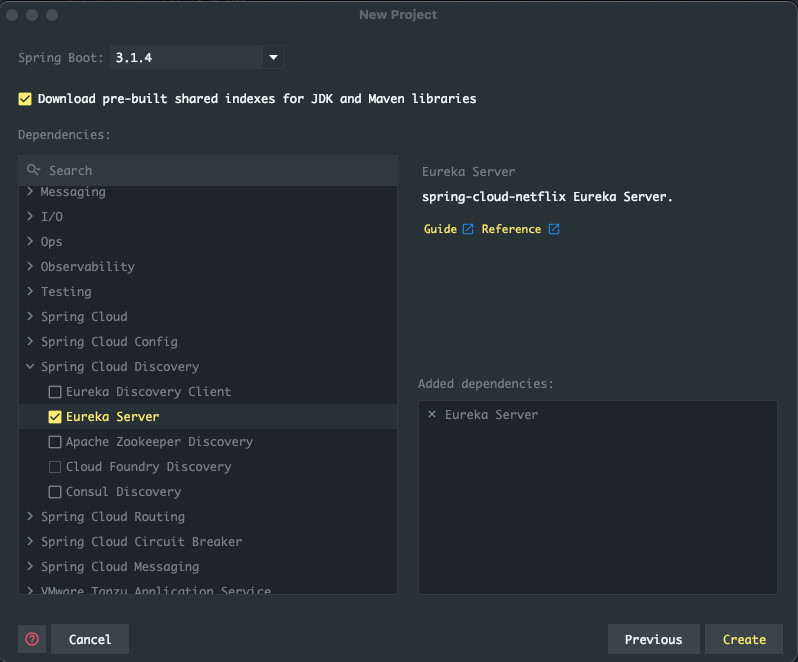
Spring Boot는 3.1.4 버전을 선택했고 좌측 Dependencies에서 Spring Cloud Discovery > Eureka Server를 선택한다.
선택하면 우측 Added dependencies 항목에 선택한 dependencies들이 추가되는 것을 확인할 수 있다.
Create 누르면 프로젝트가 생성된다.
pom.xml
프로젝트가 생성되면 가장 먼저 확인할 것은 pom.xml 파일이다. 내가 선택한 Eureka dependency가 잘 추가되었는지, 다른 설정에 이상은 없는지 확인해 보자.
<?xml version="1.0" encoding="UTF-8"?>
<project xmlns="http://maven.apache.org/POM/4.0.0" xmlns:xsi="http://www.w3.org/2001/XMLSchema-instance"
         xsi:schemaLocation="http://maven.apache.org/POM/4.0.0 https://maven.apache.org/xsd/maven-4.0.0.xsd">
    <modelVersion>4.0.0</modelVersion>
    <parent>
        <groupId>org.springframework.boot</groupId>
        <artifactId>spring-boot-starter-parent</artifactId>
        <version>3.1.3</version>
        <relativePath/> <!-- lookup parent from repository -->
    </parent>
    <groupId>com.example</groupId>
    <artifactId>discovery-service</artifactId>
    <version>0.0.1</version>
    <name>discovery-service</name>
    <description>discovery-service</description>
    <properties>
        <java.version>17</java.version>
        <spring-cloud.version>2022.0.4</spring-cloud.version>
    </properties>
    <dependencies>
        <dependency>
            <groupId>org.springframework.cloud</groupId>
            <artifactId>spring-cloud-starter-netflix-eureka-server</artifactId>
        </dependency>

        <dependency>
            <groupId>org.springframework.boot</groupId>
            <artifactId>spring-boot-starter-test</artifactId>
            <scope>test</scope>
        </dependency>

    </dependencies>
    <dependencyManagement>
        <dependencies>
            <dependency>
                <groupId>org.springframework.cloud</groupId>
                <artifactId>spring-cloud-dependencies</artifactId>
                <version>${spring-cloud.version}</version>
                <type>pom</type>
                <scope>import</scope>
            </dependency>
        </dependencies>
    </dependencyManagement>

    <build>
        <plugins>
            <plugin>
                <groupId>org.springframework.boot</groupId>
                <artifactId>spring-boot-maven-plugin</artifactId>
            </plugin>
        </plugins>
    </build>

</project>spring-cloud-starter-netflix-eureka-server가 dependency로 잘 등록되어 있는 것을 확인할 수 있으며 아래쪽 spring-cloud-dependencies로 version이 ${spring-cloud.version}으로 명시된 것을 확인할 수 있는데 이는 위에 properties안에 <spring-cloud.version>2022.0.4<spring-cloud.version>로 세팅된 값을 가져온다.
문제없이 잘 등록된 것 같다.
@SpringBootApplication
다음으로 확인할 것은 현재 상태에서 유일하게 생성되어 있는 .java 파일이다. 이 파일에서 main()이 있고 스프링은 최초의 시작점을 이 파일로 시작하는데 그때 필요한 Annotation이 @SpringBootApplication이다. 이 어노테이션이 있는 파일을 Spring Boot가 찾아서 최초의 시작을 한다.
package com.example.discoveryservice;

import org.springframework.boot.SpringApplication;
import org.springframework.boot.autoconfigure.SpringBootApplication;

@SpringBootApplication
public class DiscoveryServiceApplication {

    public static void main(String[] args) {
        SpringApplication.run(DiscoveryServiceApplication.class, args);
    }

}
이 서버는 Eureka Server로 만들 거니까 위 클래스에 @EnableEurekaServer 어노테이션을 붙여주자.
package com.example.discoveryservice;

import org.springframework.boot.SpringApplication;
import org.springframework.boot.autoconfigure.SpringBootApplication;
import org.springframework.cloud.netflix.eureka.server.EnableEurekaServer;

@SpringBootApplication
@EnableEurekaServer
public class DiscoveryServiceApplication {

    public static void main(String[] args) {
        SpringApplication.run(DiscoveryServiceApplication.class, args);
    }

}
이 밖에 추가적으로 해줄 일은 없다.
application.yml
src/main/resources경로에 보면 기본으로 application.properties 파일이 있을 건데. properties를. yml파일로 변경해서 사용할 거다.
둘 중 아무거나 사용해도 상관없다만. yml파일이 나는 더 좋다.
파일이름을 변경했으면 해당 파일에 설정값을 추가해야 한다.
server:
  port: 8761

spring:
  application:
    name: discoveryservice

eureka:
  client:
    register-with-eureka: false
    fetch-registry: false
server.port는 8761로 spring.application.name은 discoveryservice로 설정했다. 일반적인 설정 내용이고 중요한 부분은 eureka항목이다. 두 가지 설정을 해줬다.
eureka.client.register-with-eureka: false
eureka.client.fetch-registry: false
Eureka server로 기동 할 서버인데 왜 client값을 설정해야 하는가에 대한 의문이 생기는데 이 내용은 spring boot가 기본적으로 eureka server를 띄우면 본인도 eureka에 서비스로 등록이 된다. 그러나 본인은 서버이기 때문에 eureka에서 서비스로 등록할 필요가 없기 때문에 본인은 client로 등록하지 않을 것을 명시하는 설정값이라고 생각하면 된다.
Started Eureka Server
이제 필수적으로 수행할 설정을 다 끝냈으니 서버를 시작해 보자. 서버를 시작하면 하단에 Console창에 아래 같은 로그가 출력되어야 한다.
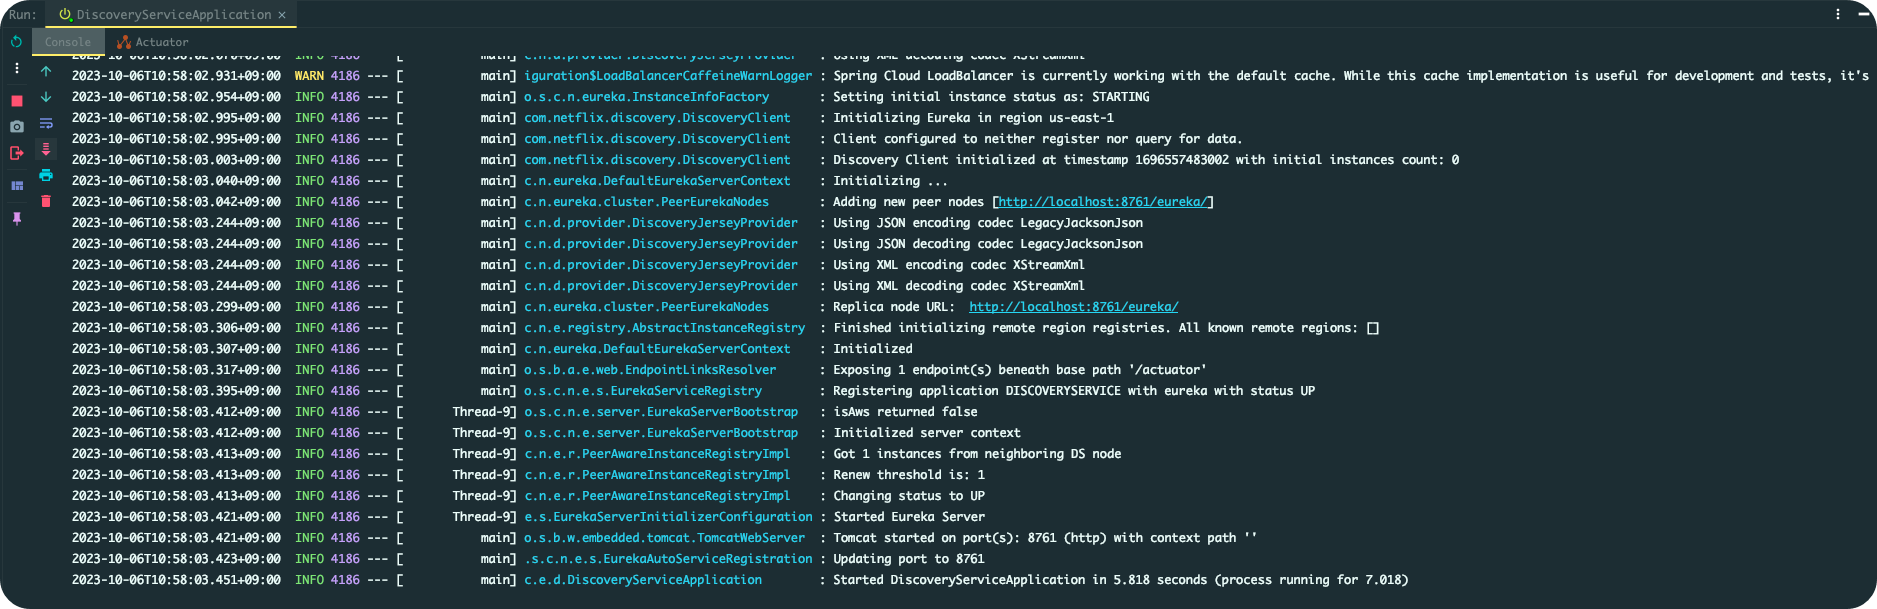
2023-10-06T10:58:50.210+09:00 INFO 4334 --- [ main] o.s.b.w.embedded.tomcat.TomcatWebServer : Tomcat started on port(s): 8761 (http) with context path ''
2023-10-06T10:58:50.212+09:00 INFO 4334 --- [ main] .s.c.n.e.s.EurekaAutoServiceRegistration : Updating port to 8761
2023-10-06T10:58:50.214+09:00 INFO 4334 --- [ Thread-9] e.s.EurekaServerInitializerConfiguration : Started Eureka Server
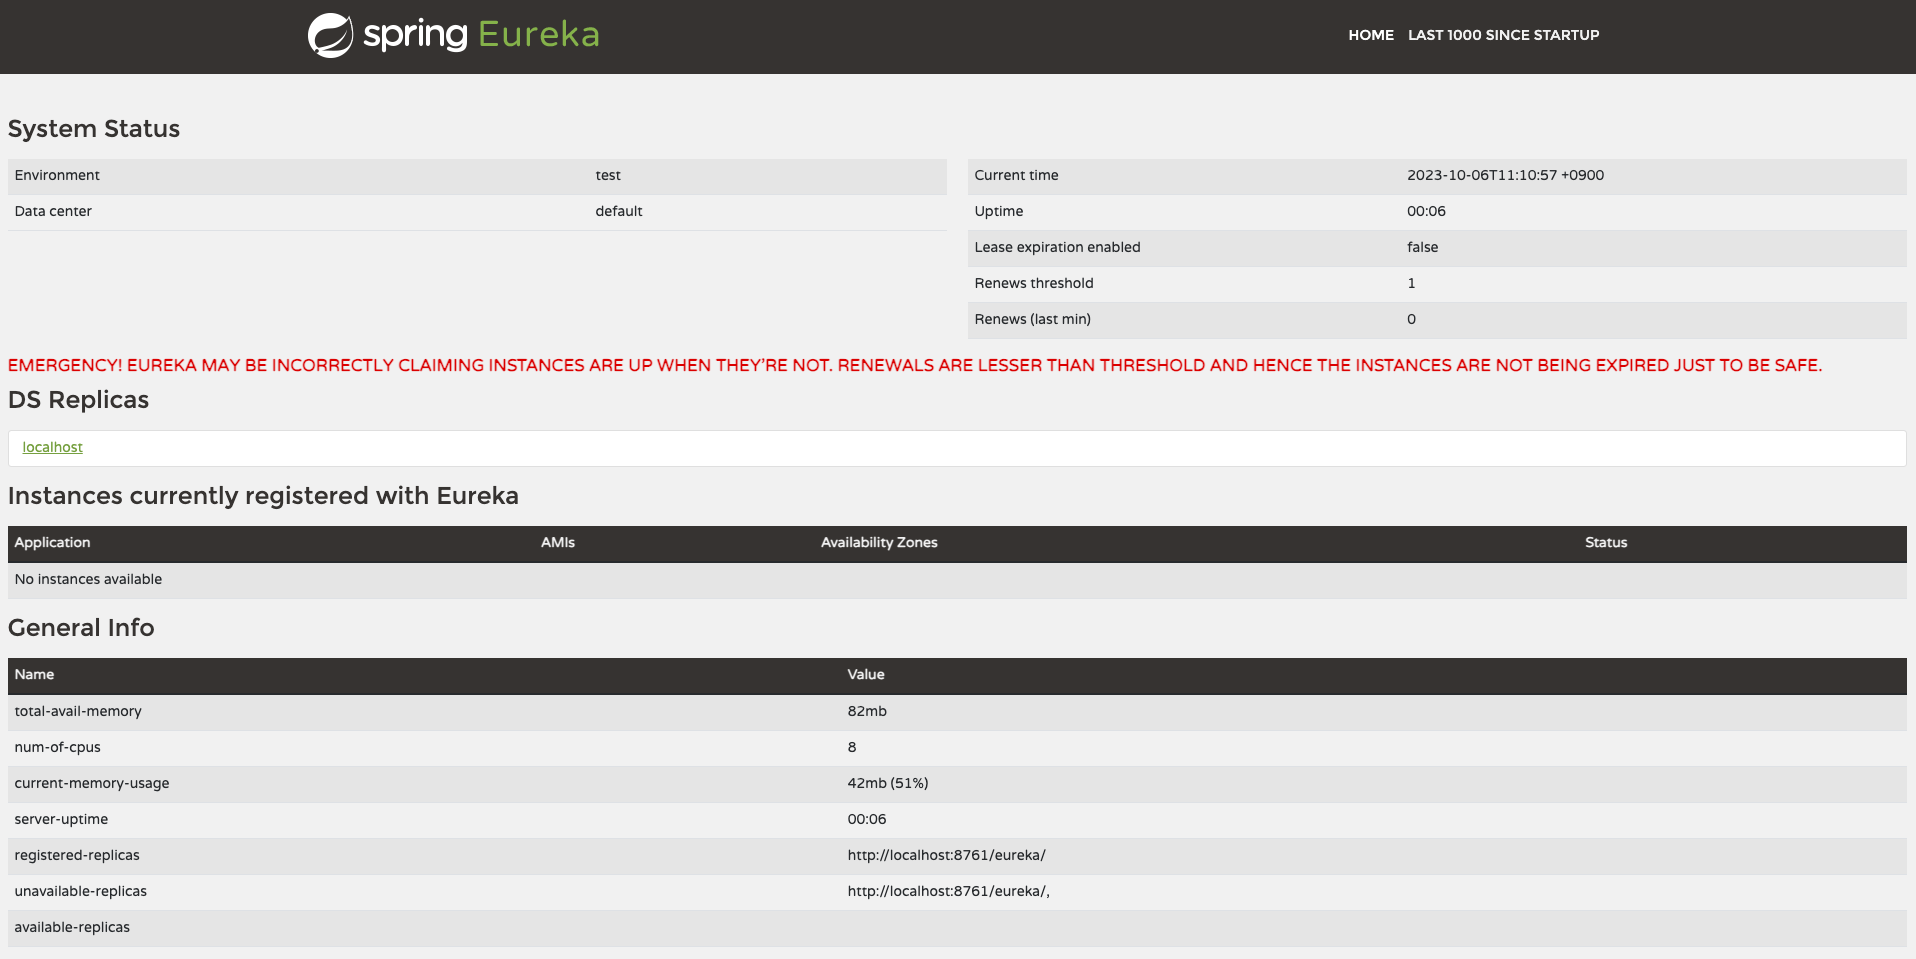
2023-10-06T10:58:50.244+09:00 INFO 4334 --- [ main] c.e.d.DiscoveryServiceApplication : Started DiscoveryServiceApplication in 4.949 seconds (process running for 6.551)서버를 띄웠으니 웹 브라우저에서 http://localhost:8761을 입력해 진입해 보면 다음과 같이 Eureka server가 띄워진다.
'MSA' 카테고리의 다른 글
| [MSA] Part 6. Gateway Filter (2) | 2023.10.10 |
|---|---|
| [MSA] Part 5. API Gateway (0) | 2023.10.06 |
| [MSA] Part 4. Service 등록 (User) (0) | 2023.10.06 |
| [MSA] Part 2. Spring Cloud란? (0) | 2023.10.06 |
| [MSA] Part 1. Spring Microservices Architecture (0) | 2023.10.05 |